How To Find Out The Current DNS Server You Are Using
Almost everyone now uses the Internet. In fact, we live in a different world on the Internet. If you visit different websites, you might be aware of DNS (Domain Name System).
Domain Name System, or DNS, is an important process that matches domain names to their correct IP Addresses. It’s a very important system; with the help of DNS, we can see different web pages on our web browser.
What Is DNS?
Let’s make things simple and try to understand what DNS is. In simple words, DNS is a database consisting of different domain names and IP addresses. Whenever a user enters domain names like Google.com or Yahoo.com, the DNS servers look at the IP addresses associated with the domains.
After matching with the IP Address, it comments on the web server of the visiting site. However, DNS servers were not always stable, especially the ones assigned by the ISPs. That’s the most probable reason behind the DNS errors we see while browsing different websites.
What About Custom DNS?
Well, if you are using your ISP’s default DNS servers, you will most likely face DNS-related errors at regular intervals. Some common DNS errors include DNS Lookup Failed, DNS Server Not Responding, DNS_Probe_Finished_Nxdomain, etc.
Almost every DNS-related issue could be solved by choosing a custom DNS. There are many Public DNS servers available out there that you can use, like Google DNS, OpenDNS, etc. We have also shared a detailed guide on Switch To Google DNS, which you can consider.
However, before switching the DNS server, it’s always best to note down the current DNS server. So, below, we have discussed a few methods that will help you check the DNS you are using.
What DNS Am I Using?
Well, there are multiple methods to check what DNS you are using. Below, we have listed some of the best methods to help you check your Windows DNS. So, make sure to follow the guide carefully, as we will be using CMD to find DNS.
Check DNS On Windows
To check the DNS server you are using on Windows, you need to use CMD. Right-click the Start Button and then choose ‘Command Prompt (Admin)’.
Now, on the Command Prompt, you need to enter the following command.
ipconfig /all | findstr /R "DNS\ Servers"
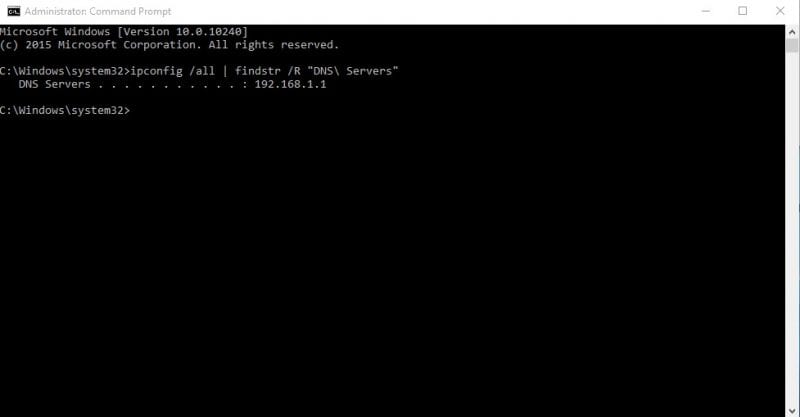
This command will list the current DNS server that you are using. You can also use the other method to know the DNS server on Windows. To do so, you need to enter the command given below.
nslookup google.com
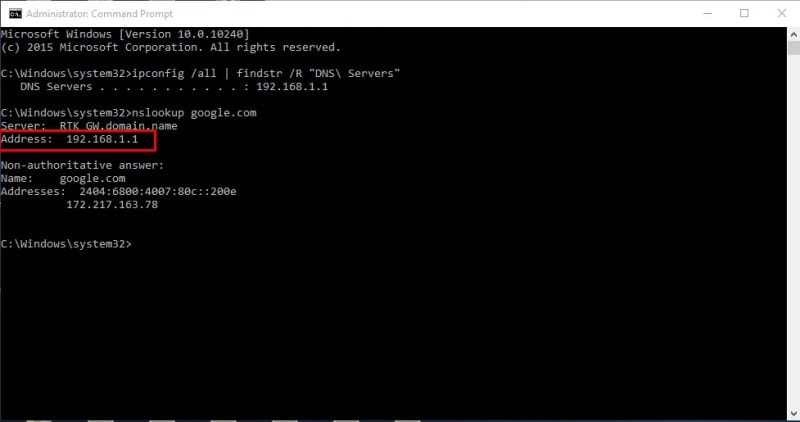
You can use any website domain instead of Google.com. The command will list the current DNS server. So, these are the two CMD commands to know DNS on a Windows computer.
What DNS am I Using? Mac & Linux
Well, on Mac and & Linux-based computers, you need to enter the same CMD command to know what DNS server you are using. Simply enter the command given below to do nslookup on any website.
nslookup google.com
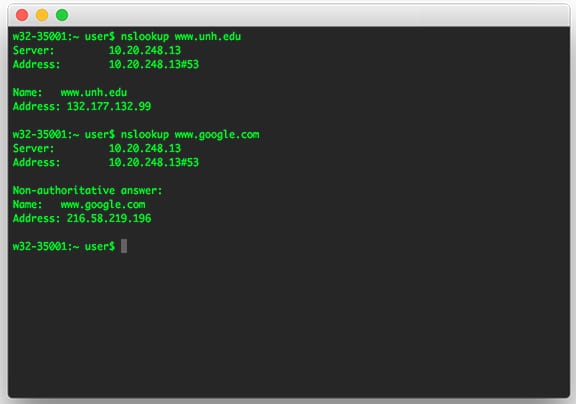
Again, you can replace Google.com with any website of your choice. This is how you can check the DNS server on Mac and Linux computers.
Check DNS Server On Android
You can use any network scanner app on Android to know what DNS Server your Android is using. In addition, you can use free apps like Network Info II, which doesn’t show any ads.
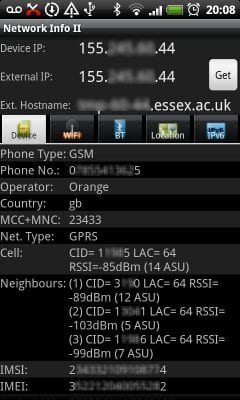
On Network Info II, you must look at the WiFi tab and then check the DNS1 And DNS2 entries. These are the DNS addresses your phone is using.
What DNS am I using? iPhone
Like Android, iOS has numerous network scanner apps to help you find the DNS server. One of the popular network scanner apps for iOS is Network Analyser. Network Analyzer for iOS provides plenty of useful information about your WiFi network.
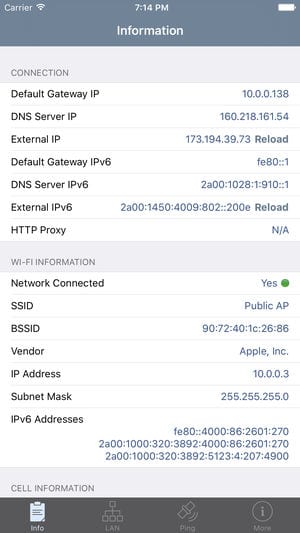
So, on iOS, you can use Network Analyzer and then look at the ‘DNS Server IP’.
Check the DNS Server Of the Router
For those who don’t know, the router uses the DNS Server, which the ISP assigns. However, that can be changed by following the guidelines given in this article. If you want to know what DNS server your router is using, head to the router’s IP Address (192.168.1.1 or 192.168.0.1) and log in with the username and password.
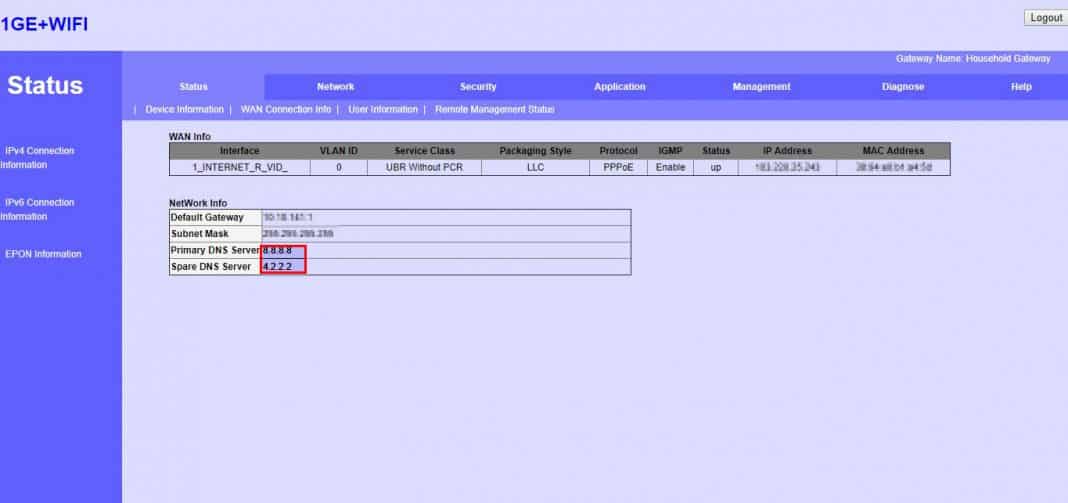
Now, you will see the Router homepage. Depending on the router mode, you must check the Wireless Network or Network tab. There, you will find the options for DNS 1 and DNS 2 entries. You can update the new DNS address there if you wish to change.
Best Free Public DNS Servers
Your ISP provides you with a default DNS server, which often leads to various web errors. In addition, the ISP-assigned DNS servers also lead to slow internet speed.
Hence, if you want better speed and better security, switching to public DNS servers is recommended. Many free public DNS servers are available out there that provide better browsing speed and security.
Some free public DNS servers can even unblock blocked content on the web.
How To Change DNS Servers on Windows and Android?

We have shared a detailed guide on how to change DNS servers on Windows 10 computers. If you are using a Windows operating system, read our article – How To Change Default DNS To Google DNS For Faster Internet.
For Android users, we recommend this article: 10 Best DNS Changer Apps For Android. In this article, we have shared a few best Android apps for changing the DNS server on Android.
These are some simple methods to find out the DNS server used on your devices. If you need more help on this topic, feel free to discuss it with us in the comments. And if you find this guide helpful, don’t forget to share it with others.
The post How To Find Out The Current DNS Server You Are Using appeared first on TechViral.
ethical hacking,hacking,bangla ethical hacking,bangla hacking tutorial,bangla tutorial,bangla hacking book,ethical hacking bangla,bangla,hacking apps,ethical hacking bangla tutorial,bangla hacking,bangla hacking pdf,bangla hacking video,bangla android hacking,bangla hacking tutorials,bangla fb hacking tutorial,bangla hacking book download,learn ethical hacking,hacking ebook,hacking tools,bangla ethical hacking course, tricks,hacking,ludo king tricks,whatsapp hacking trick 2019 tricks,wifi hacking tricks,hacking tricks: secret google tricks,simple hacking tricks,whatsapp hacking tricks,tips and tricks,wifi tricks,tech tricks,redmi tricks,hacking trick paytm cash,hacking trick helo app,hacking trick of helo app,paytm cash hacking trick,wifi password hacking,paytm cash hacking trick malayalam,hacker tricks, tips and tricks,pubg mobile tips and tricks,tricks,tips,tips and tricks for pubg mobile,100 tips and tricks,pubg tips and tricks,excel tips and tricks,google tips and tricks,kitchen tips and tricks,season 2 tips and tricks,android tips and tricks,fortnite tips and tricks,godnixon tips and tricks,free fire tips and tricks,advanced tips and tricks,whatsapp tips and tricks, facebook tricks,facebook,facebook hidden tricks,facebook tips and tricks,facebook latest tricks,facebook tips,facebook new tricks,facebook messenger tricks,facebook android app tricks,fb tricks,facebook app tricks,facebook tricks and tips,facebook tricks in hindi,tricks,facebook tutorial,new facebook tricks,cool facebook tricks,facebook tricks 2016,facebook tricks 2017,facebook secret tricks,facebook new tricks 2020,blogger blogspot seo tips and tricks,blogger tricks,blogger,blogger seo tips,blogger seo tips and tricks,seo for blogger,blogger seo in hindi,blogger seo best tips for increasing visitors,blogging tips and tricks,blogger blog seo,blogger seo in urdu,adsense approval trick,blogging tips and tricks for beginners,blogging tricks,blogger tutorial,blogger tricks 2016,blogger tricks 2017 bangla,tricks,bangla tutorial,bangla magic,bangla motivational video,bangla tricks,bangla tips,all bangla tips,magic tricks,akash bangla tricks,top 10 bangla tricks,tips and tricks,all bangla trick,bangla computer tricks,computer bangla tricks,bangla magic card tricks,ms word bangla tips and tricks,bangla computer tips,trick,psychology tricks,youtube bangla,magic tricks bangla,si trick Credit techviral


