How to Fix CxUIUSvc Service High CPU & RAM Usage (6 Ways)
While Windows 10 is a very stable operating system, Windows 11 is still new and needs many improvements. Most of the drivers are still incompatible with the latest Windows 11.
Recently, many Windows 10 and Windows 11 users have been facing problems due to the Conexant SmartAudio II driver. Windows users have reported that CxUIUSvc Service is causing high CPU and RAM usage on Windows 10.
If your PC has the Conexant card and you are facing a problem due to the Conexant SmartAudio II driver, you may find this guide quite helpful. This guide will share some basic methods to resolve CxUIUSvc Service High CPU Usage.
What is CxUIUSvc Service?
Before understanding the CxUIUSvc service, you must know about the Conexant. Back in 2015, laptops and a few computers used to ship with audio chips from Conexant.
For the proper functioning of the audio chipset, the Conexant SmartAudio II driver was used. However, the arrival of Realtek into the industry changed everything; its audio driver supported most of the audio chipset.
So, if you see the CxUIUSvc service on the Task Manager, it’s a component of the Conexant SmartAudio driver. It has to do with the audio chipset of your device, and it’s something you shouldn’t disable.
How to Fix CxUIUSvc service High CPU and RAM Usage
Now that you know what CxUIUSvc service is, you may look for ways to resolve the high CPU or RAM usage problem. The CxUIUSvc service should consume little of the system’s resources, but if it’s, you should follow the methods below.
1. Restart your computer

Both Windows 10 and Windows 11 automatically scan for device driver updates and install them in the background. When the system tries to update your audio drivers, it will raise the RAM and CPU usage.
So, chances are that your device recently received a Conexant SmartAudio driver update, and it’s stuck in the installation part. You can easily fix such problems by restarting your computer.
After restart, reopen the task manager and check whether the CxUIUSvc service is still raising the high CPU and RAM usage.
2. Update Your Audio Drivers
Many laptop users have claimed to resolve the CxUIUSvc service’s high CPU usage by updating their audio drivers to the latest version.
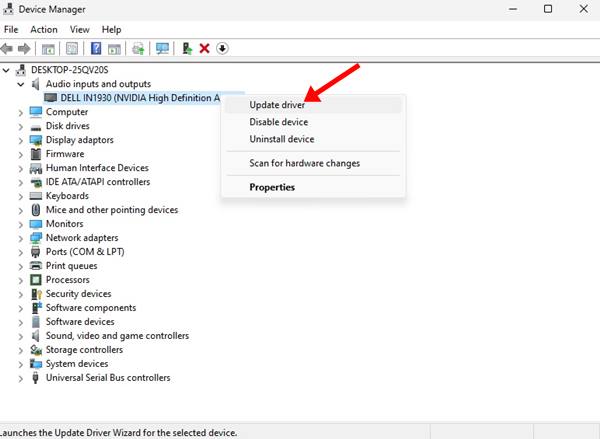
Updating Audio drivers on the Windows operating system is easy; open the Device Manager, expand the Audio section, and update your installed audio drivers.
Alternatively, you can use third-party driver updaters to update your audio drivers. There are many free third-party audio drivers available on the web that do their job pretty well. You can use such programs to update all your outdated device drivers.
3. Rollback Audio Drivers
If there’s no update available for your audio drivers, try rolling back them to their previous version. This should fix the CxUIUSvc service high CPU usage problem. Here’s what you need to do.

- Open Device Manager on your computer.
- Expand the Audio input and outputs.
- Right-click on your speaker driver, and select Properties.
- Next, switch to the Driver tab, and select Roll back driver
That’s it! This is how you can roll back audio drivers to fix CxUIUSvc service high RAM usage on Windows 10/11.
4. Reinstall the Audio Device
If the CxUiUSvc Service still raises the graphs for CPU & RAM usage on the task manager, it’s recommended to reinstall the audio drivers on your device. Here’s how you can reinstall the Audio drivers on Windows.
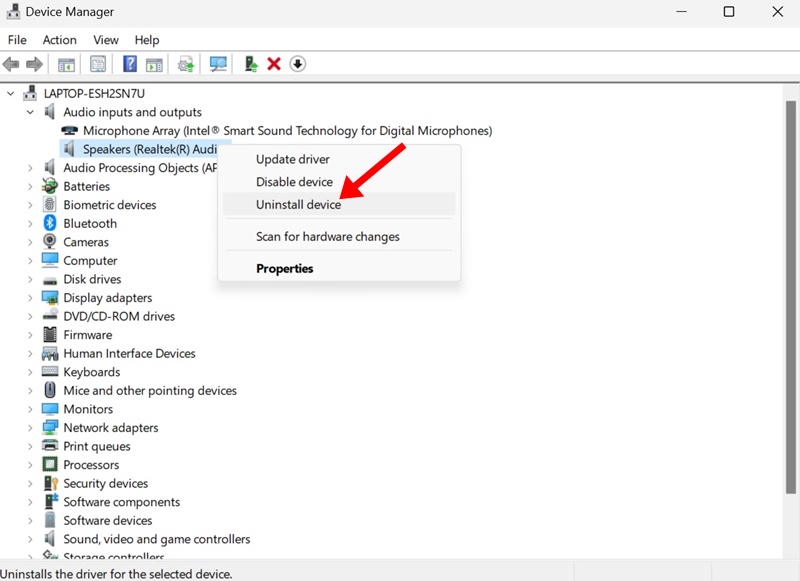
- Open the Device Manager app from the Windows Search.
- When the Device Manager opens, expand the audio inputs and outputs tree.
- Select the audio device and select Uninstall Device.
- Once uninstalled, restart your computer.
After the restart, when your PC boots, it will install the device and the compatible drivers. This should fix the CxUiUSvc service high CPU/RAM usage issue.
5. Manually Install the Conexant SmartAudio Drivers
Conexant SmartAudio HD or Conexant Audio drivers are hard to find, but you can get them from the website of your laptop’s manufacturer.
For example, if you use a Lenovo Laptop, head to Lenovo’s official website and search for Conexant Audio Drivers. You need to download the most compatible driver with your laptop model.
After downloading it, uninstall your existing audio driver via Device Manager and install the driver you’ve downloaded. After installing the driver manually, restart your laptop to fix the problem.
6. Disable Cxuiusvc Service
If Cxuiusvc Service is still raising the CPU and RAM usage and freezing your computer, the ultimate way to fix this issue is by disabling the Cxuiusvc Service. However, disabling the Cxuiusvc Service might hamper the performance of your audio devices.
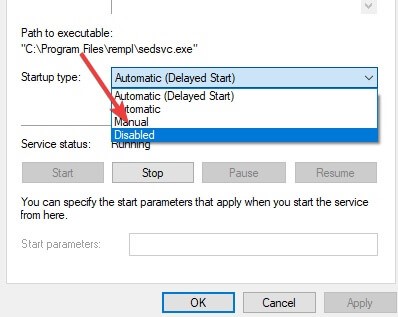
- First of all, open Windows search and type Services.
- Open the Service app and find Cxuiusvc Service.
- Right-click on Cxuiusvc Service and select Properties.
- On the Startup type, select Disabled.
Once done, click on Apply and then onOKk.
That’s it! This is how you can fix Cxuiusvc Service high RAM usage on Windows.
So, this guide is about fixing the High CPU on Cxuiusvc Service in Windows 10/11. If you need more help fixing Cxuiusvc Service’s high RAM/CPU usage, let us know in the comments. Also, if the article helped you, share it with your friends.
The post How to Fix CxUIUSvc Service High CPU & RAM Usage (6 Ways) appeared first on TechViral.
ethical hacking,hacking,bangla ethical hacking,bangla hacking tutorial,bangla tutorial,bangla hacking book,ethical hacking bangla,bangla,hacking apps,ethical hacking bangla tutorial,bangla hacking,bangla hacking pdf,bangla hacking video,bangla android hacking,bangla hacking tutorials,bangla fb hacking tutorial,bangla hacking book download,learn ethical hacking,hacking ebook,hacking tools,bangla ethical hacking course, tricks,hacking,ludo king tricks,whatsapp hacking trick 2019 tricks,wifi hacking tricks,hacking tricks: secret google tricks,simple hacking tricks,whatsapp hacking tricks,tips and tricks,wifi tricks,tech tricks,redmi tricks,hacking trick paytm cash,hacking trick helo app,hacking trick of helo app,paytm cash hacking trick,wifi password hacking,paytm cash hacking trick malayalam,hacker tricks, tips and tricks,pubg mobile tips and tricks,tricks,tips,tips and tricks for pubg mobile,100 tips and tricks,pubg tips and tricks,excel tips and tricks,google tips and tricks,kitchen tips and tricks,season 2 tips and tricks,android tips and tricks,fortnite tips and tricks,godnixon tips and tricks,free fire tips and tricks,advanced tips and tricks,whatsapp tips and tricks, facebook tricks,facebook,facebook hidden tricks,facebook tips and tricks,facebook latest tricks,facebook tips,facebook new tricks,facebook messenger tricks,facebook android app tricks,fb tricks,facebook app tricks,facebook tricks and tips,facebook tricks in hindi,tricks,facebook tutorial,new facebook tricks,cool facebook tricks,facebook tricks 2016,facebook tricks 2017,facebook secret tricks,facebook new tricks 2020,blogger blogspot seo tips and tricks,blogger tricks,blogger,blogger seo tips,blogger seo tips and tricks,seo for blogger,blogger seo in hindi,blogger seo best tips for increasing visitors,blogging tips and tricks,blogger blog seo,blogger seo in urdu,adsense approval trick,blogging tips and tricks for beginners,blogging tricks,blogger tutorial,blogger tricks 2016,blogger tricks 2017 bangla,tricks,bangla tutorial,bangla magic,bangla motivational video,bangla tricks,bangla tips,all bangla tips,magic tricks,akash bangla tricks,top 10 bangla tricks,tips and tricks,all bangla trick,bangla computer tricks,computer bangla tricks,bangla magic card tricks,ms word bangla tips and tricks,bangla computer tips,trick,psychology tricks,youtube bangla,magic tricks bangla,si trick Credit techviral


