How To Fix ‘The Media Could Not be Loaded’ Error In Google Chrome
Let’s admit it! We have all been there at some point—when browsing the web, finding a video we want to watch, and playing it only to see an error message. Windows users often deal with video error messages like ‘Error Loading Player’, ‘The Media Could Not be Loaded’, etc., while playing videos through the web browser.
We received multiple messages from our readers regarding the ‘The Media Could Not be Loaded’ error message. The entire error message reads – ‘The media could not be loaded, either because the server or network failed or because the format is not supported’.
The Media Could Not be Loaded Error in Chrome
So, what does the error message mean? To be honest, the error message doesn’t pinpoint a single reason behind the video playback error. It might be because of the server, due to your network, or due to the unsupported video file format.
Until you fix the ‘The media could not be loaded, either because the server or network failed or because the format is not supported’ error message, you can’t watch the desired videos. So, if you are also getting the ‘The media could not be loaded’ error message, we will share some of the best methods to fix web browser video errors.
How to Fix ‘The Media Could Not be Loaded’ Error In Google Chrome
In this article, we have shared some of the best methods for fixing the ‘The media could not be loaded’ error message from the web browser.
1. Check for Internet Issues
Internet is often the main reason behind the ‘The Media Could Not be loaded’ Chrome error. This happens when the browser fails to load the video due to internet issues.
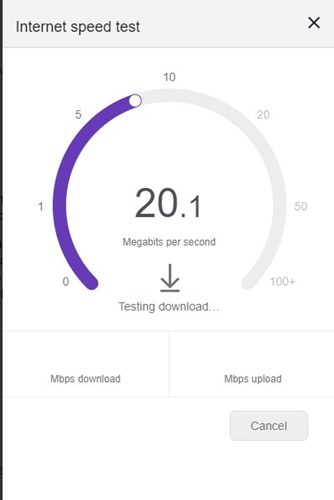
Hence, it’s recommended to check for internet issues before trying any advanced methods. To check if your internet is working, you can use speed test websites.
2. Reload the Webpage
After ruling out internet issues, the next best thing you can do is refresh the webpage. Sometimes, webpages experience problems and fail to play media files.
Reloading the webpage can eliminate such problems. To refresh the page, click the reload button beside the address bar.
After the refresh, check whether you can watch the video without error. If you still get the error, try the next methods.
3. Update Your Web Browser
An outdated web browser invites many bugs and errors. Many Windows users have resolved the ‘The media could not be loaded’ error message by updating their web browsers.
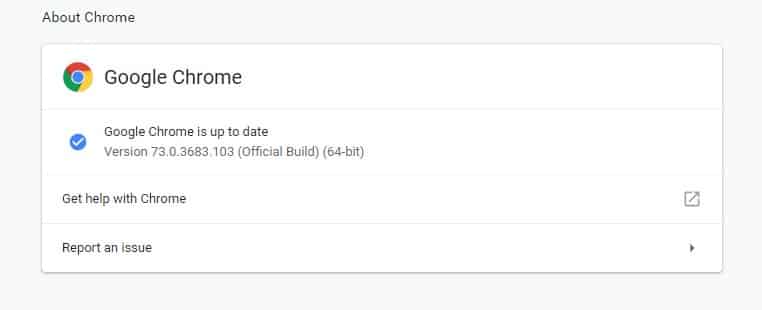
Updating the web browser can fix almost all browser-related problems and provide a better browsing experience. So, head to Settings > Help > About Google Chrome. Now, wait until Google Chrome checks for the browser updates.
4. Disable Adblocker from the webpage
Video players and hosts worldwide are now using this technique to get visitors to turn off Adblocking software or extensions.
Webmasters display the ‘The media could not be loaded’ error message when it detects the adblocker extension or software.
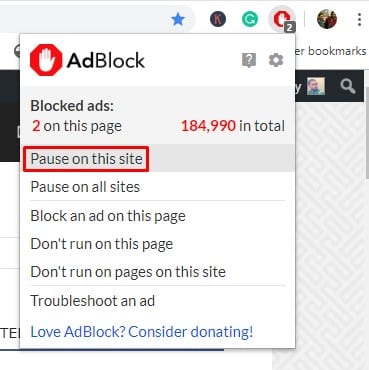
So, if that was the case, the problem could be resolved by turning off the Adblocking software or extension. To disable Adblock on a specific website, follow some simple steps below.
- Open the webpage where you are getting the error message.
- Click on the adblocker extension.
- Click on ‘Don’t run on this page’
That’s it; you are done! This is how you can disable AdBlock for the webpage to fix the ‘The media could not be loaded because the format is not supported’ error message.
5. Enable or Disable VPN
Yes, VPNs are great privacy and security tools to make you anonymous and remove your footprints on the web, but they can sometimes create problems with media playback.
If you cannot play the video while connected to a VPN, you must turn it off. The opposite of it can also be true. If you cannot play the video with your regular IP Address, try connecting to a VPN.
Enabling or disabling will possibly resolve the Media Could Not be Loaded error on the Chrome browser.
6. Change the DNS server
Sometimes, users get the ‘The Media Could Not be Loaded’ error because of DNS issues. If you’re using the DNS server assigned by your ISP, you will face problems because such free servers are often very crowded and less optimized.
You can try switching to the Google DNS server and refreshing the webpage as a solution. Here’s what you need to do.
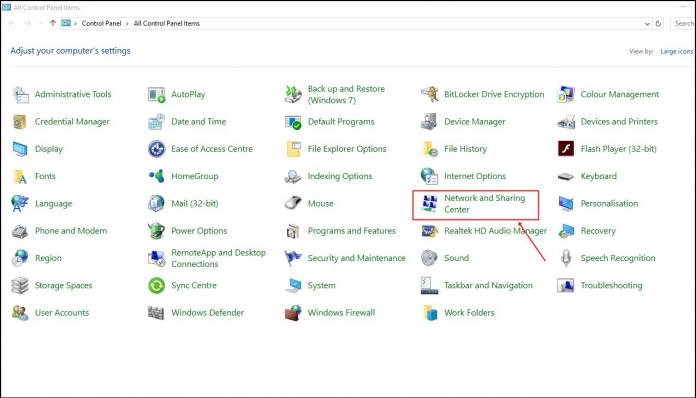
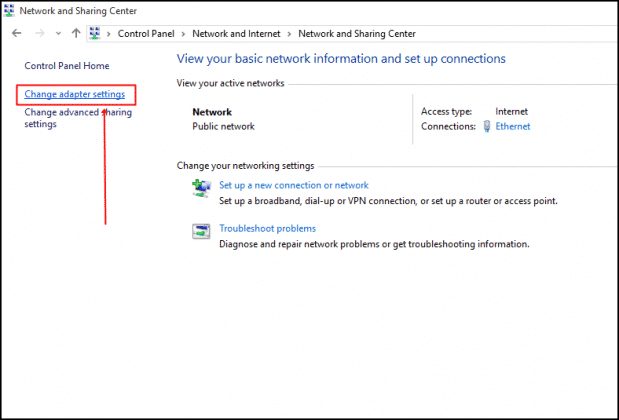
1. Open the Control Panel on your Windows PC and click on Network and Sharing Center.
2. On the Network and Sharing Center, click on Change adapter settings.
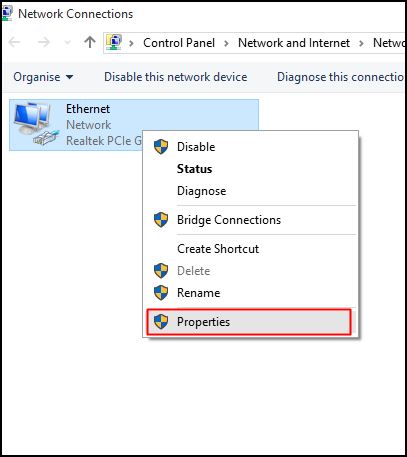
3. Right click on your connected network adapter and select Properties.
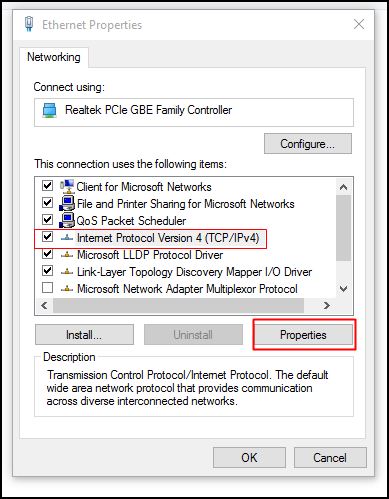
4. Select the Internet Protocol Version 4 and click Properties.
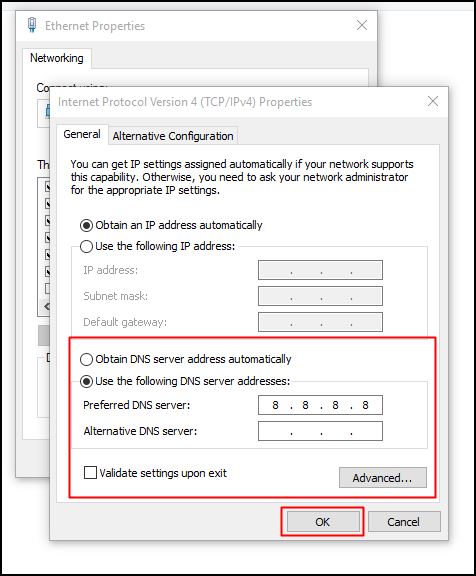
5. On the Preferred DNS Server, type 8.8.8.8; on the Alternative DNS Server, enter 8.8.4.4. Once done, click OK.
That’s it! This will switch to the Google DNS Server. Make sure to restart your PC to apply the changes.
7. Clear the Cache & Cookies
Outdated cache and cookies often trigger many error messages, including ‘The media could not be loaded because the format is not supported’. So, you could try clearing the cache and cookies to fix the ‘The media could not be loaded because the format is not supported’.
Many users on the Microsoft forum have claimed that the ‘The media could not be loaded because the format is not supported’ error message has been resolved by clearing the old cache and cookies from the web browser.
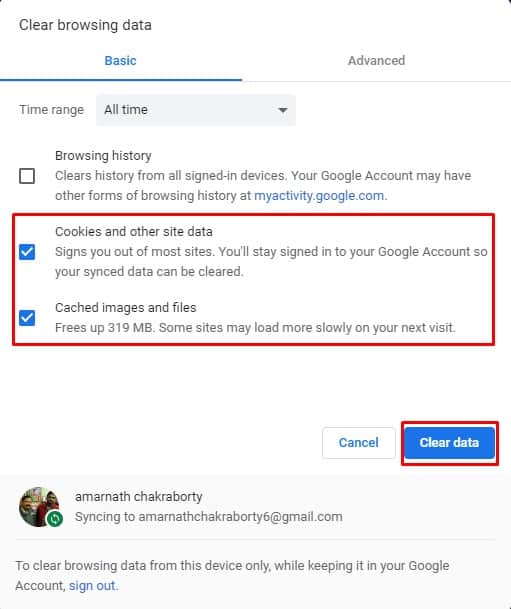
So, head to Settings > Advanced Options. Now on the Advanced options, click ‘Clear Browsing Data’. Select the cache and cookies from the list, then click ‘Clear browsing data’. Once done, restart your browser to fix the ‘The media could not be loaded because the format is not supported’ error message.
8. Reset Your Chrome Browser
Resetting should be your last resort if everything else fails to fix ‘The Media Could Not be Loaded’ error message. To reset your Chrome browser, follow these steps.
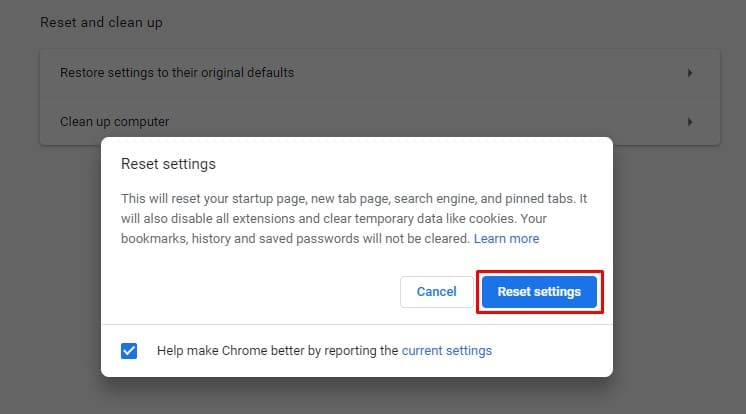
Head to Settings > Advanced Options. On the Advanced Options, scroll down and click the ‘Restore Settings to their original defaults’ option. On the prompt that appears, select ‘Reset Settings’.
9. Reinstall the Google Chrome Browser
The Media could not be loaded error can also appear due to incorrect Chrome browser settings. Although Resetting Chrome will revert the user-made settings, if there’s a problem with the Chrome profile, you will have to reinstall the web browser.
So, open the Control Panel and uninstall the Google Chrome browser. Once uninstalled, reinstall the latest version of Chrome browser on your PC and try playing the video again.
10. Try Different Browser
If the problem appears even after clearing the cache and cookies, you need to try a different browser. The ‘The media could not be loaded because the format is not supported’ is said to affect all internet browsers, but most of the time, it affects only one specific web browser for one victim of this issue.
So, if everything fails to fix the ‘The media could not be loaded because the format is not supported’ error message while playing a video, you could try a different browser.
So, these are the best methods to fix the ‘The media could not be loaded, either because the server or network failed or because the format is not supported’ error message. Let us know in the comment box below if you know of any other method to fix the error.
The post How To Fix ‘The Media Could Not be Loaded’ Error In Google Chrome appeared first on TechViral.
ethical hacking,hacking,bangla ethical hacking,bangla hacking tutorial,bangla tutorial,bangla hacking book,ethical hacking bangla,bangla,hacking apps,ethical hacking bangla tutorial,bangla hacking,bangla hacking pdf,bangla hacking video,bangla android hacking,bangla hacking tutorials,bangla fb hacking tutorial,bangla hacking book download,learn ethical hacking,hacking ebook,hacking tools,bangla ethical hacking course, tricks,hacking,ludo king tricks,whatsapp hacking trick 2019 tricks,wifi hacking tricks,hacking tricks: secret google tricks,simple hacking tricks,whatsapp hacking tricks,tips and tricks,wifi tricks,tech tricks,redmi tricks,hacking trick paytm cash,hacking trick helo app,hacking trick of helo app,paytm cash hacking trick,wifi password hacking,paytm cash hacking trick malayalam,hacker tricks, tips and tricks,pubg mobile tips and tricks,tricks,tips,tips and tricks for pubg mobile,100 tips and tricks,pubg tips and tricks,excel tips and tricks,google tips and tricks,kitchen tips and tricks,season 2 tips and tricks,android tips and tricks,fortnite tips and tricks,godnixon tips and tricks,free fire tips and tricks,advanced tips and tricks,whatsapp tips and tricks, facebook tricks,facebook,facebook hidden tricks,facebook tips and tricks,facebook latest tricks,facebook tips,facebook new tricks,facebook messenger tricks,facebook android app tricks,fb tricks,facebook app tricks,facebook tricks and tips,facebook tricks in hindi,tricks,facebook tutorial,new facebook tricks,cool facebook tricks,facebook tricks 2016,facebook tricks 2017,facebook secret tricks,facebook new tricks 2020,blogger blogspot seo tips and tricks,blogger tricks,blogger,blogger seo tips,blogger seo tips and tricks,seo for blogger,blogger seo in hindi,blogger seo best tips for increasing visitors,blogging tips and tricks,blogger blog seo,blogger seo in urdu,adsense approval trick,blogging tips and tricks for beginners,blogging tricks,blogger tutorial,blogger tricks 2016,blogger tricks 2017 bangla,tricks,bangla tutorial,bangla magic,bangla motivational video,bangla tricks,bangla tips,all bangla tips,magic tricks,akash bangla tricks,top 10 bangla tricks,tips and tricks,all bangla trick,bangla computer tricks,computer bangla tricks,bangla magic card tricks,ms word bangla tips and tricks,bangla computer tips,trick,psychology tricks,youtube bangla,magic tricks bangla,si trick Credit techviral

