How to Enable or Disable Network Adapter in Windows 11
Whenever your PC connects to a new network, Windows 11 automatically creates a network profile. Resetting, renaming, or configuring the network adapters is easy on Windows 11. You can also manually turn network adapters on or off.
Sometimes, you may want to turn off a network adapter for several reasons. For example, if your device has multiple network adapters, you may want to disable the ones you don’t use so they don’t interfere. Alternatively, you can disable the network adapter to resolve pending issues.
1. Disable/Enable Network Adapter via Settings
This method will use the Windows 11 Settings app to turn a network adapter on or off. Here’s what you need to do.
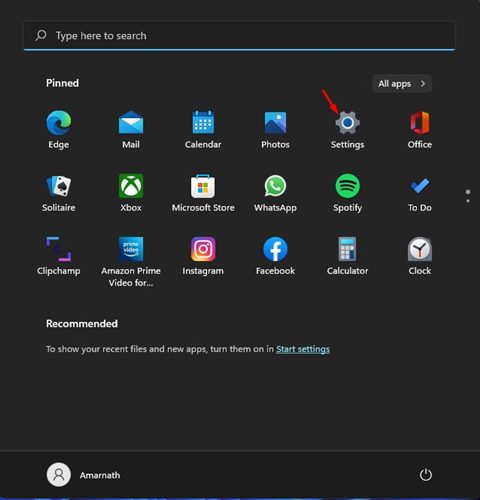
1. Click on the Windows 11 Start button and select Settings.
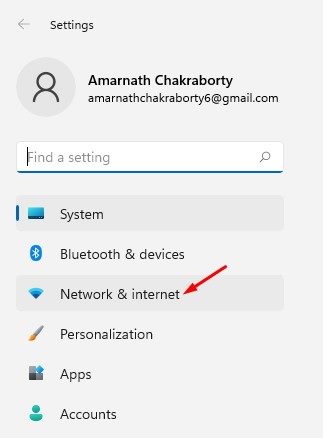
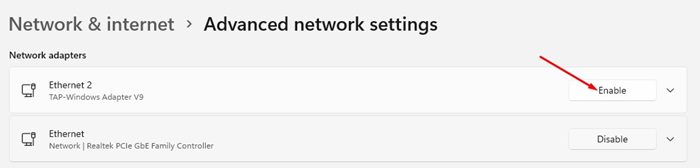
2. On the Settings page, click on the Network & Internet option as shown below.
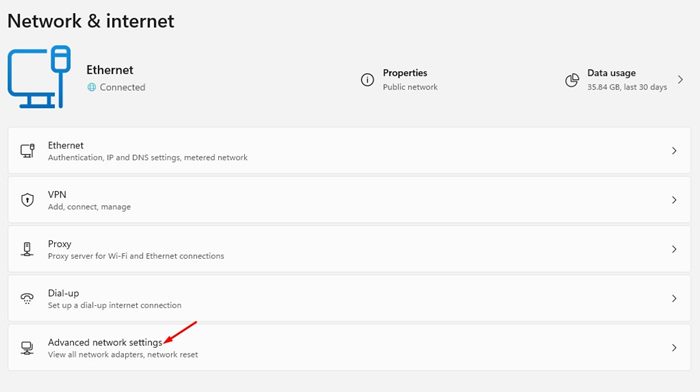
3. Scroll down to the right pane and tap the Advanced network settings option, as shown in the screenshot below.
4. Under the Network adapters, select the adapter you want to disable and click the Disable button.
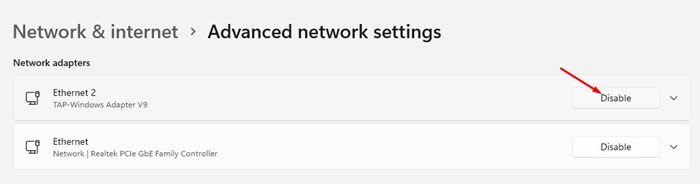
5. To enable the Network adapter, click on the Enable button.
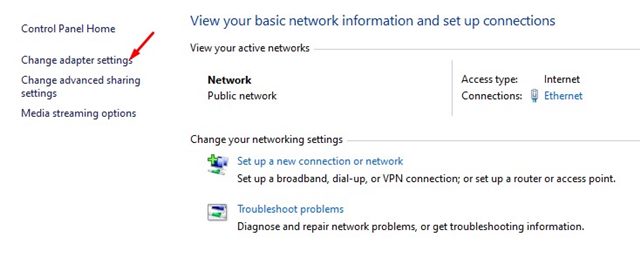
2. Disable/Enable Network Adapter via Control Panel
This method will use the Control Panel to disable or enable the Network Adapter. Here are some of the simple steps you need to follow.
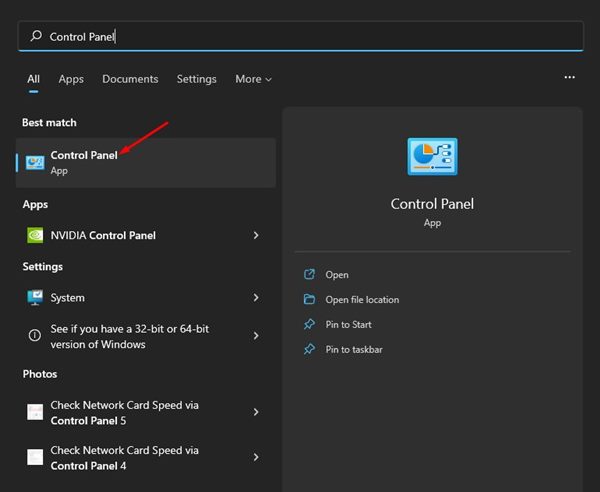
1. First, click the Windows Search and type in Control Panel. Next, select the Control Panel app from the list.
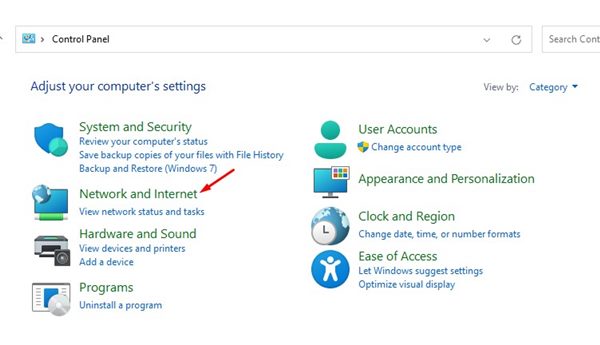
2. On the Control Panel, click on the Network and Internet option.
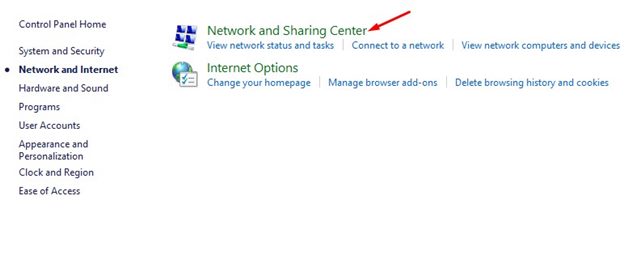
3. Click the Network and Sharing Center option on the next page.
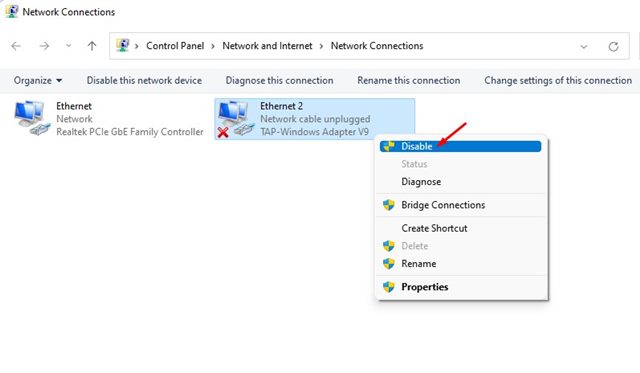
4. On the left pane, click the Change adapter settings link.
5. Now, you will be able to see all network adapters. You need to right-click on the adapter you want to turn off and select the Disable option.
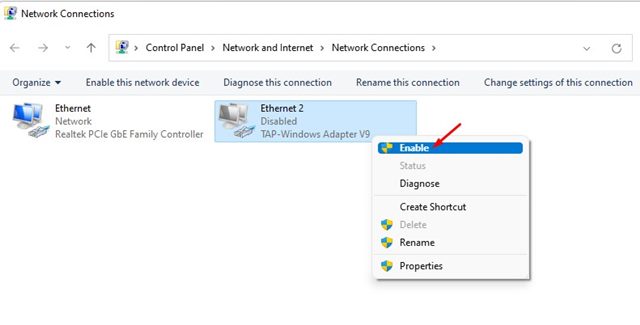
6. To enable the network adapter, right-click on the adapter name and select Enable.
3. Disable/Enable Network Adapter via Device Manager
Like the control panel, you can utilize the Device Manager of your Windows 11 PC to disable or enable the Network adapter. Here’s how to use Device Manager to turn on or off network adapters on Windows 11.
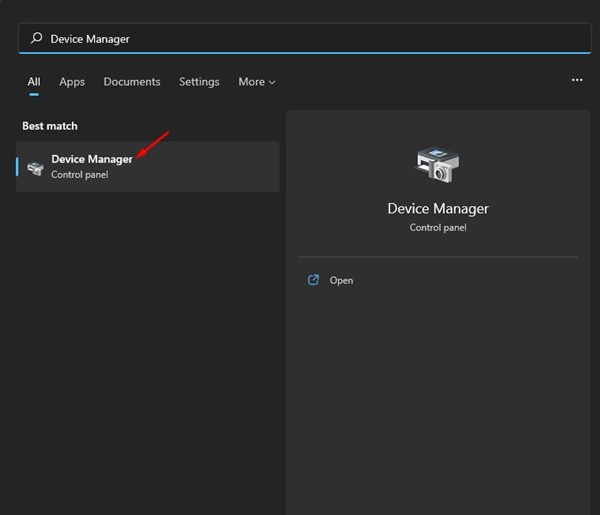
1. Open the Windows 11 search and type in Device Manager. Next, click on the Device Manager from the list of options.
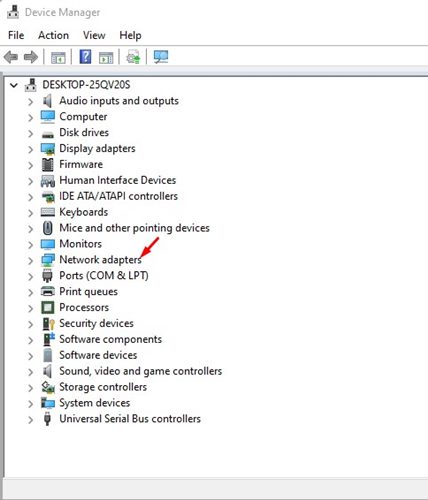
2. On the Device Manager, expand the Network adapters.
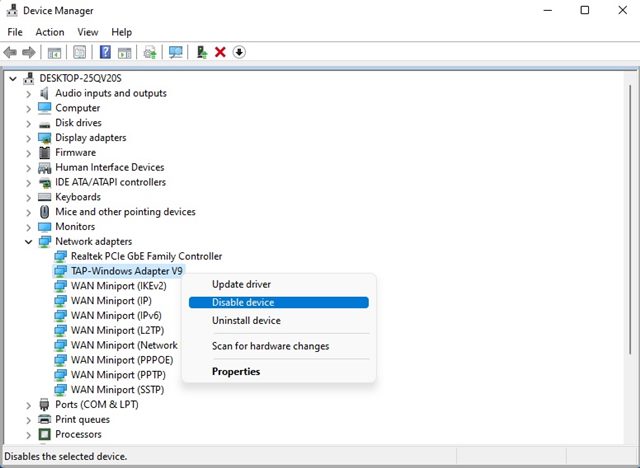
3. Now right-click on the adapter you want to turn off and select Disable Device.
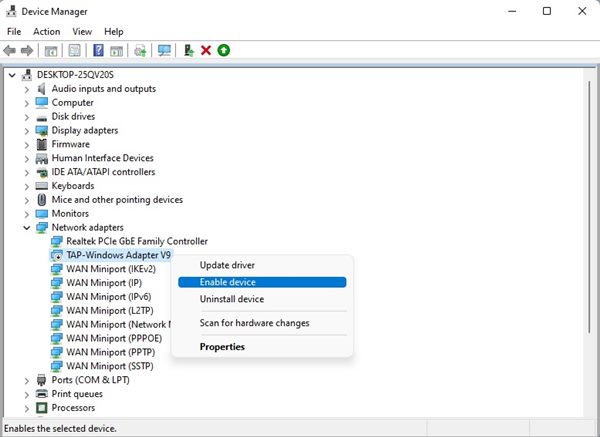
4. To enable the Network adapter, right-click on the network device and select Enable Device.
4. Enable/Disable Network Adapters via Command Prompt
You can also use the Command Prompt utility to enable or disable the network adapters on Windows 11. Here’s how to do so via CMD.
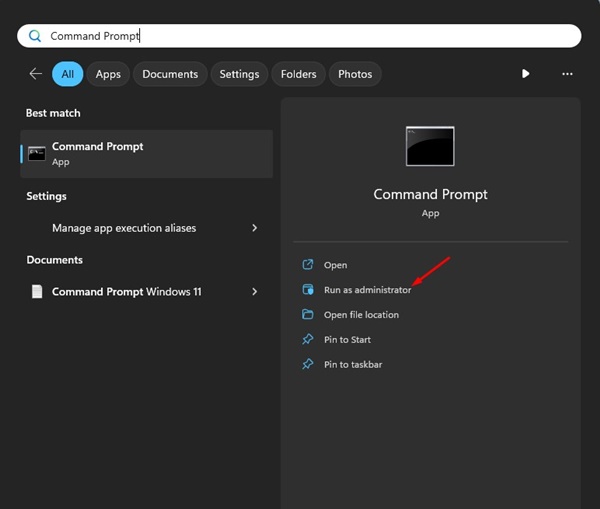
1. Type Command Prompt on the Windows 11 Search. Right-click on the Command Prompt and select Run as administrator.
2. When the Command Prompt opens, execute this command:
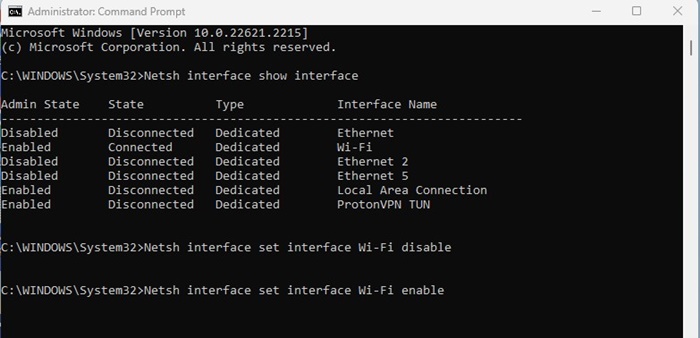
Netsh interface show interface
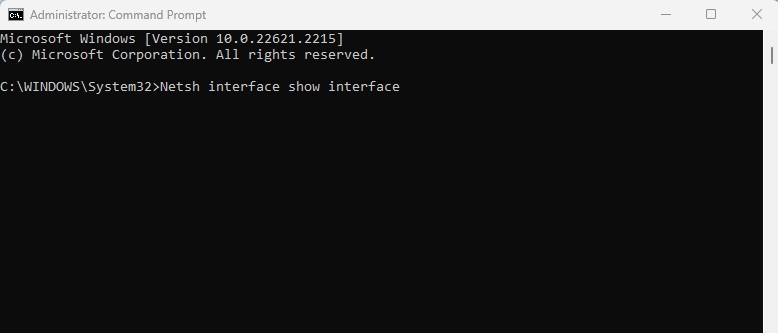
3. The above command will list all network adapters. Note the interface name, which is the network adapter you want to disable.
4. Now execute the given command by replacing the Interface name with the name you noted above. (Without quotation marks)
Netsh interface set interface "Interface Name" disable
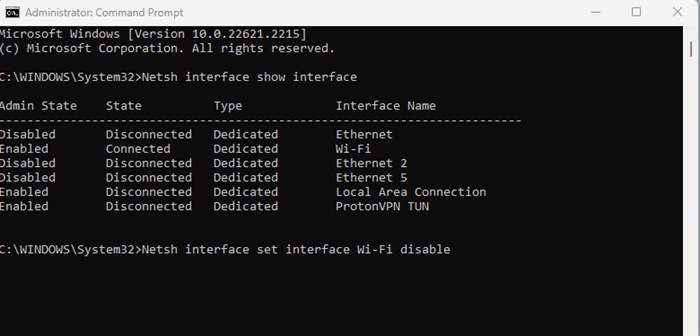
5. The above command will turn off the network adapter.
6. To enable the network adapter, execute the given command by replacing the interface name with the adapter name you want to enable. (Without quotation marks)
Netsh interface set interface "Interface Name" enable
5. Enable to Disable Network Adapters via PowerShell
Like the Command Prompt, the Powershell utility can enable or disable the network adapters. Here’s how to do it.
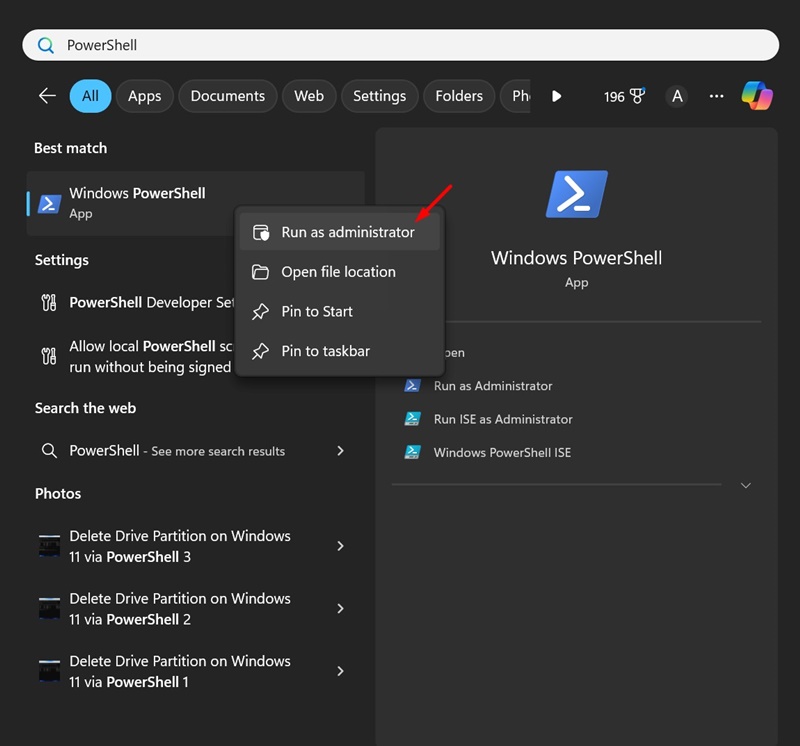
1. Type in PowerShell in the Windows 11 Search. Next, right-click on PowerShell and select Run as administrator.
2. When the Powershell opens, execute the given command:
Get-NetAdapter | format-table

3. You will see lots of information. You need to note down the network adapter name (the text displayed underneath name)
4. If a network adapter is enabled, the IndexStatus will show ‘Up’. If the IndexStatus shows ‘Down’, the network adapter is disabled.
5. To turn off a network adapter, execute this command:
Disable-NetAdapter -Name "Network Adapter Name" -Confirm:$false

6. If you wish to enable a network adapter, execute this command:
Enable-NetAdapter -Name "Network Adapter Name" -Confirm:$false

After enabling or disabling the network adapter, close the Powershell utility.
Disabling or enabling a network adapter in Windows 11 is pretty easy. I hope this article helped you! Please share it with your friends also. If you have any doubts, let us know in the comment box below.
The post How to Enable or Disable Network Adapter in Windows 11 appeared first on TechViral.
ethical hacking,hacking,bangla ethical hacking,bangla hacking tutorial,bangla tutorial,bangla hacking book,ethical hacking bangla,bangla,hacking apps,ethical hacking bangla tutorial,bangla hacking,bangla hacking pdf,bangla hacking video,bangla android hacking,bangla hacking tutorials,bangla fb hacking tutorial,bangla hacking book download,learn ethical hacking,hacking ebook,hacking tools,bangla ethical hacking course, tricks,hacking,ludo king tricks,whatsapp hacking trick 2019 tricks,wifi hacking tricks,hacking tricks: secret google tricks,simple hacking tricks,whatsapp hacking tricks,tips and tricks,wifi tricks,tech tricks,redmi tricks,hacking trick paytm cash,hacking trick helo app,hacking trick of helo app,paytm cash hacking trick,wifi password hacking,paytm cash hacking trick malayalam,hacker tricks, tips and tricks,pubg mobile tips and tricks,tricks,tips,tips and tricks for pubg mobile,100 tips and tricks,pubg tips and tricks,excel tips and tricks,google tips and tricks,kitchen tips and tricks,season 2 tips and tricks,android tips and tricks,fortnite tips and tricks,godnixon tips and tricks,free fire tips and tricks,advanced tips and tricks,whatsapp tips and tricks, facebook tricks,facebook,facebook hidden tricks,facebook tips and tricks,facebook latest tricks,facebook tips,facebook new tricks,facebook messenger tricks,facebook android app tricks,fb tricks,facebook app tricks,facebook tricks and tips,facebook tricks in hindi,tricks,facebook tutorial,new facebook tricks,cool facebook tricks,facebook tricks 2016,facebook tricks 2017,facebook secret tricks,facebook new tricks 2020,blogger blogspot seo tips and tricks,blogger tricks,blogger,blogger seo tips,blogger seo tips and tricks,seo for blogger,blogger seo in hindi,blogger seo best tips for increasing visitors,blogging tips and tricks,blogger blog seo,blogger seo in urdu,adsense approval trick,blogging tips and tricks for beginners,blogging tricks,blogger tutorial,blogger tricks 2016,blogger tricks 2017 bangla,tricks,bangla tutorial,bangla magic,bangla motivational video,bangla tricks,bangla tips,all bangla tips,magic tricks,akash bangla tricks,top 10 bangla tricks,tips and tricks,all bangla trick,bangla computer tricks,computer bangla tricks,bangla magic card tricks,ms word bangla tips and tricks,bangla computer tips,trick,psychology tricks,youtube bangla,magic tricks bangla,si trick Credit techviral


